Let’s Make a Distributed Object Cache in .NET with WCF 4’s Peer-to-Peer Binding

A distributed object cache is a system that allows one program to store an object in memory and have it available to another program on another computer.  Any node can store and make changes to the object.   Caches make huge performance improvements in certain workflows.  One of the more popular is Memcached, which I was hoping to use but was disappointed when I found that the devs have not made a .NET client library.  I would rather use one made by the Memcached team than some third party. Winking smile

Making an object cache in .NET is pretty straight forward when you think about it – its just a key-value pair with items that timeout after some time interval.  Making it work over the network is potentially difficult in a decentralised design but WCF 4 has the wonderful NetPeerTcpBinding that does all the tricky work of discovering, joining and leaving a virtual mesh of nodes in the distributed cache via a peer-to-peer (P2P) mesh.  Actually NetPeerTcpBinding was introduced in 3.5 or possibly 3 but WCF 4 is so much easier on the whole but I digress.

Basically NetPeerTcpBinding acts very much like NetTcpBinding so get your program to work with that first.  To transition to NetPeerTcpBinding you merely change your binding – no other changes to program flow are required.

Here’s a snippet of my WCF cache host config file:

<bindings>
         <netNamedPipeBinding>
             <binding name="noSecurityPipeCofig">
                 <security mode="None" />
             </binding>
         </netNamedPipeBinding>
         <netPeerTcpBinding>
             <binding name="noSecurityP2PBinding">
                 <security mode="None" />
             </binding>
         </netPeerTcpBinding>
         <netTcpBinding>
             <binding name="tcpNoSecurityConfig">
                 <security mode="None" />
             </binding>
         </netTcpBinding>
     </bindings>
     <services>
         <service behaviorConfiguration="myServiceBehaviour" name="Schmicky.Cache.Services.CacheService">
             <clear />
             <endpoint address="announcements" binding="netPeerTcpBinding"
                 bindingConfiguration="noSecurityP2PBinding" name="p2pEndpoint"
                 contract="Schmicky.Cache.Contracts.Interfaces.ICacheBroadcast"
                 listenUriMode="Explicit">
           
             </endpoint>
             <endpoint address="local" binding="netNamedPipeBinding" bindingConfiguration="noSecurityPipeCofig"
                 name="pipe" contract="Schmicky.Cache.Contracts.Interfaces.ICacheQuery" />
             <host>
                 <baseAddresses>
                     <add baseAddress="net.p2p://broadcastmesh/SchmickyCache/" />
                     <add baseAddress="net.pipe://SchmickyCache/" />
                 </baseAddresses>
             </host>
         </service>
     </services>

You will note that I have two endpoints.  The reason for this is that the P2P generally only allows for announcements and therefore one-way calls.  This sort of threw a spanner into the works as I thought a cache wouldn’t be too good if you could only store and not retrieve.

Then I thought, well why not make a secondary full-duplex endpoint just for queries?  That would work, and so I made use of the high-speed channel from NetNamedPipeBinding.  It doesn’t matter that its local host only because both endpoints are talking to the local cache access point host.  Yipee!

So with two endpoints it makes sense to map them to two different interfaces – one for storage and the other for cache query and retrieval:

[ServiceContract(ProtectionLevel = ProtectionLevel.None)]
    public interface ICacheBroadcast
    {
        /// <summary>
        /// Puts the specified item.
        /// </summary>
        /// <param name="request">The request.</param>
        [OperationContract(IsOneWay = true)]
        void Put(PutItemRequest request);

        [OperationContract(IsOneWay = true)]
        void Touch(string key);
    }


[ServiceContract( ProtectionLevel = ProtectionLevel.None, SessionMode = SessionMode.Allowed)]
    public interface ICacheQuery
    {
        [OperationContract(IsOneWay = false)]
        GetItemResponse Get(GetItemRequest request);
    }

When an item is stored it is broadcast to all other nodes in the mesh very quickly.  Retrieving an item is immediate for the app storing it in the first place as there is no network latency.  Remote nodes won’t know about it till it is broadcast there.  When any node gets an item I send an asynchronous touch command to all other nodes to keep the item alive.  .NET 4’s Task class is quite useful here.

The best thing about the P2P in WCF is that there is no looping’ing of sending updates to each node – its all encapsulated by WCF. Think UDP.

So now I have a working distributed cache and it only took me a day to do.  Who said things are too complex?

Till next time.
Golly…Macs Really Do “Just Work”!

I was recently lucky enough to grab myself an iMac; in that time it has solved more problems than the time I have spent trying to solve a single problem on Windows.

Computer Specs

Memory Windows= iMac =4GB
CPU Windows=Intel Core 2 Extreme Quad @ 3GHz,  iMac=2.8GHz Quad-Core Intel Core i5
Video Windows=dual nVidia 8800 GTX,   iMac=ATI Radeon HD 5670


Before

Here is a list of my prior issues:

  • iTunes on PC and generation 1 Apple TV would “forget” their network connection
    • meaning my Apple TV could no longer sync/stream TV shows and movies from my PC
    • typically you buy on the Apple TV and after watching it is “archived” on your PC to make room for other purchases
    • I had lost a few purchases because of this.  Apple does not allow you to download to Apple TV again
  • Could not connect to a Canon MX850 printer via the network if it was connected to one PC via USB
    • basically allows you to share the printer over a single USB cable instead of a network cable
    • USB allows you to do certain things network cable cant
  • Lacie 4big Quadra 4TB RAID “big blue button” not recognized
    • allows for quick backup
    • Windows Backup is inefficient, slow and poorly designed
  • Access to Apple’s MobileMe email via Microsoft Outlook/Windows Live Essentials IMAP is incredibly slow – 5 seconds to delete a message
  • Opening the majority of any document takes considerable time on Windows
    • PDF
    • videos
    • Word/Excel documents
  • MSN Messenger takes considerable time to load; consumes excessive computer resources
  • Games such as the recent Civilization V consume excessive resources; takes considerable time to load considering nature of application – “its no Crysis!”
  • Windows Phone developer registration is more complex than applying for a home mortgage.  Took approximately 7 days to complete including various to and throw e-mails to Microsoft
  • Visual Studio has historically shown that with each new version requires a level of magnitude more computer memory and CPU resources.   VS is very expensive to buy for the Pro version. Express as a tool for serious development is questionable

After

  • Apple TV and iTunes on iMac just work; do not forget each other
  • Canon MX850 was automatically detected over wi-fi when plugged into Airport Extreme Base Station USB socket
  • Lacie 4big Quadra 4TB RAID was automatically detected and iMac kindly asked if I wished to use it for TimeMachine
    • Pressing big blue button on Lacie launched the brilliant TimeMachine app
    • TimeMachine is fast, intuitive, reliable
  • Apple’s iMail automatically configured e-mail server settings just by me typing in my @me.com address
    • iMail is fast
    • Like the central inbox
  • iMacs have a Preview application that very quickly opens a document for reading rather than loading bloatware Acrobat, Microsoft Word, Excel or similar
  • MS Messenger for iMac (via Office Mac) is much like pre-Windows Live Essentials meaning it doesn’t have the annoying ads but more importantly, uses less computer resources like memory and CPU in wlcomm.exe
  • Civilization V for iMac loads considerably quicker and exits to mac desktop much faster than Windows
  • Apple’s Mac Developer MacOS/iOS registration completed in 12 hours
  • Apple’s Xcode IDE is only $5.00 and uses minimal CPU and memory
  • Though Apple may make use of seemingly vertical standards such as Bonjour, historically it can be shown that Apple is more likely to adopt more popular standards with more realized use cases than say MS.  Calendering is a good example.

In summary, in only a short time does one really appreciate the high quality of the iMac, but also comes to the realization that pretty much everything PC is by way of poorly designed, badly integrating bloatware produced by capitalist-corporate-hugging software houses.   Take Microsoft Office 2010 is not only bloated but is also unintuitive and bloated; similarly for VS2010 as mentioned.

Tutorial: On the Fly Effect, Material and Model Mapping

UPDATE: be sure to check out my YouTube channel where you can see live-action of content such as this article as well is other subjects.


By using a ModelProcessor custom content pipeline processor you can import 3D assets and automatically have the XNA Model class linked to the appropriate textures and HLSL FX code.  No more individual code for loading effects, models and no more horrid manual mapping (or should I say re-mapping) of effects to models mesh parts.

LoadContent() now looks as clean as:

_stoneyBox = Content.Load<Model>(“models/stoneybox”);


So How is This Done?

In the case of FBX file formats, there is a wonderful amount of metadata that is sadly being ignored by our old friend BasicEffect and the standard model import pipeline.  By doing some of our own magic we can access this data and automatically connect shaders, textures and models together.

Add your model to your Content folder, this should be a FBX, at this stage X does not not seem to have all the smarts in it.

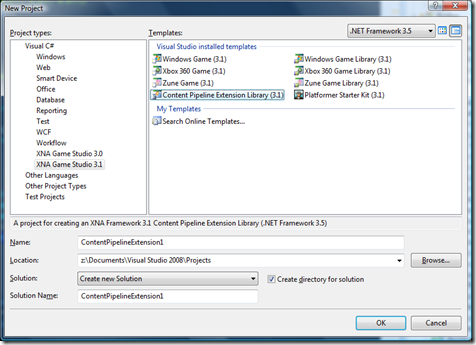
Right-click your Solution and choose Add.New Project…

Then in the appearing window, select Content Pipeline Extension Library and do the usual filename stuff, adding it to your solution.

image

This will create a new project with a default class.  Delete what is there and replace with something like the following.

[ContentProcessor(DisplayName = “Custom Effect Model Processor – MickyD”)]
public class CustomEffectModelProcessor : ModelProcessor

{

protected override MaterialContent ConvertMaterial(MaterialContent material, ContentProcessorContext context)
{
EffectMaterialContent myMaterial = new EffectMaterialContent();

if (material is BasicMaterialContent)
{
Log(context, “Material is basic”);

// do appropriate basic stuff here
}
else if (material is EffectMaterialContent)
{
EffectMaterialContent effectMaterialContent = (EffectMaterialContent) material;

//
// remap effect
//
myMaterial.Effect = new ExternalReference<EffectContent>(effectMaterialContent.Effect.Filename);

// textures
foreach (KeyValuePair<string, ExternalReference<TextureContent>> pair in effectMaterialContent.Textures)
{
string textureKey = pair.Key;
ExternalReference<TextureContent> textureContent = pair.Value;

if (!string.IsNullOrEmpty( textureContent.Filename))
{
myMaterial.Textures.Add(textureKey, material.Textures[textureKey]);
Log(context, “Set texture ‘{0}’ = {1}”, textureKey, textureContent.Filename);
}
}

}

return base.ConvertMaterial(myMaterial, context);
}

Compile your solution making sure everything is fine. OK, now we have a custom pipeline in the solution but nothing is actually using it yet.  We do have that FBX we added before, wouldn’t it be schmick to have it use the pipeline?

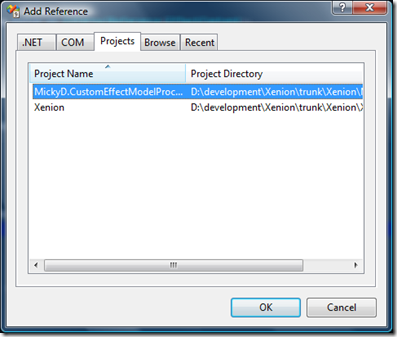
Well first we need to add a reference to the pipeline project to our main project.  Once done we get a cool new drop-down option on model’s Content Processor property.  In your main project, right-click Content (NOTE it’s the Content references we want NOT project references), choose Add reference and add a reference to your pipeline project on the Projects tab.

image

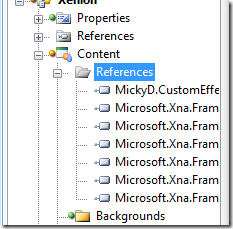
If all goes well it should look something like this:

image

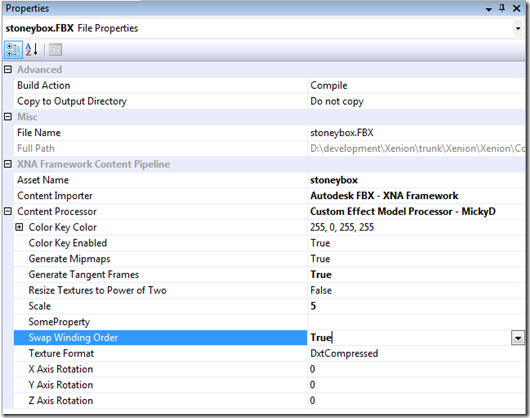
Back in your main project (the one with your Content folder holding your assets anyway), right-click your FBX model to bring up the Properties window.  If you look there should be a new choice in the Content Processor field. Fill it out as follows with particular attention to:

  • Content Processor = (whatever your custom effect model processor is)
  • Generate Tangent Frames = true
  • Scale = … (depends on your model)
  • Swap Winding Order = true EDIT: actually leave this to false

image

Now we can load the model in our LoadContent() as follows:

_stoneyBox = Content.Load<Model>(“models/stoneybox”);

Note though that we still need a reference to the effect so that we can pass parameters.  (unless of course your shader has none)

_stoneyEffect = _stoneyBox.Meshes[0].Effects[0];

Note this is the complete reverse of the usual tutorials – which load the model AND effect and then re-apply the effect to the model!

In my draw function I do need to pass though the light position.  I guess if it wasn’t moving (which it wasn’t) I could just do it during LoadContent().  Oh well.

_stoneyEffect.Parameters[“light1Pos”].SetValue(light1Pos);

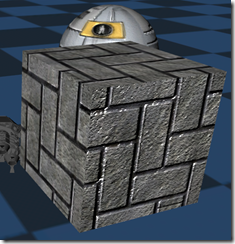
Here you can see our friend the cube, but with a:

  • diffuse texture map
  • normal bump map
  • diffuse color
  • specular highlights

image

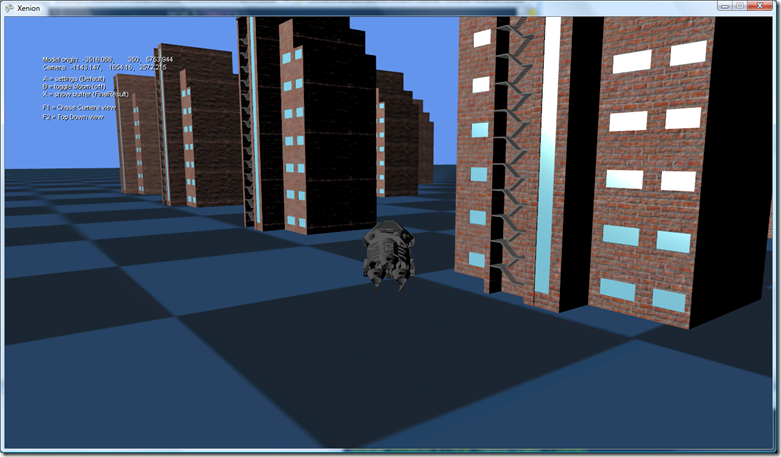
And here’s a shoot of a few buildings.  Each building is a single FBX model with multiple FX (or materials) in XNA (glass, bricks, tar roof)

image

That’s it.  With this technique, there is minimal code required to load your models with the correct textures and effects.  What’s more it is only necessary to add your model to your project – not the textures and effects.  I like to export my models out of 3DS Max directly into my Content/Models folder.  I don’t tell Max to export the textures but rather have it just put the path into the FBX so that the pipeline can load my textures directly out of material library folder at compile time.  This works for me, but understandably it may not suit others.  That is fine.


EDIT: The draw code for drawing a XNA model with one or more custom effects is as below:

/// <summary>
///     Draws the with custom effect.
/// </summary>
/// <param name = “model”>The model.</param>
/// <param name = “world”>The world.</param>
/// <param name = “viewMatrix”>The view matrix.</param>
/// <param name = “projectionMatrix”>The projection matrix.</param>
/// <param name = “offset”>The offset.</param>
public static void DrawWithCustomEffect(Model model,
Matrix world,
Matrix viewMatrix,
Matrix projectionMatrix,
Vector3 offset)
{
var transforms = new Matrix[model.Bones.Count];
model.CopyAbsoluteBoneTransformsTo(transforms);

var translation = Matrix.CreateTranslation(offset);
foreach (var mesh in model.Meshes)
{
foreach (var effect in mesh.Effects)
{
var w = transforms[mesh.ParentBone.Index] * world * translation;

effect.CurrentTechnique = effect.Techniques[“Complete”];
effect.Parameters[“wvp”].SetValue(w * viewMatrix * projectionMatrix);
effect.Parameters[“worldI”].SetValue(Matrix.Invert(w));
effect.Parameters[“worldIT”].SetValue(Matrix.Transpose(Matrix.Invert(w)));

effect.Parameters[“viewInv”].SetValue(Matrix.Invert(viewMatrix));

effect.Parameters[“world”].SetValue(w);

foreach (var pass in effect.CurrentTechnique.Passes)
{
pass.Apply();
mesh.Draw();
}
}
}
}